Saturday, 22 December 2012

More on the VSF Flyer--Geodesic Tower

The concept of the flyer (and most of my projects) came from simple doodles which usually evolve thru subsequent doodles. As I have said before, I like to let the project speak to me and let it develop as it progresses.

An historical project evolves via thought, sketches and construction largely in the material and techniques used to represent the known object. The design of a fantasy project can really be influenced by having a basic concept and letting the materials do some of the work. Just start building and let the project evolve. Try things out to find the “look" you are searching for. I have a box of plastic bits and model kit leftovers I have been nursing along for 30 years or more, so any project involves sifting through the bits an selecting parts that might be of use.
Though not originally planned, (and this is one of the beauties of the technique of letting the project evolve as you work with it) I had been doing some research on pre-dreadnought ships and early battleships and I have always like the “geodesic” masts on some of the early American battleships. I decided this type of mast would liven up the vast round blankness of the main deck. It would also form the support for the flying bridge and the propeller shaft.
Work on the tower began with making a light cardboard tube in the size and taper required. I basically rolled up a sheet of light cardboard (similar to the backing of a notepad) and glued it together. I then cut two rings of Evergreen 60 thou plastic. I drilled them for 12 uprights. I also drilled smaller holes, two at each upright,on slight angles. The smaller holes were in two concentric rings This allowed an inner “layer” of the uprights of 40 thou Evergreen styrene rod and two winding layers of 30 thou rod. One layer of the smaller rod spirals clockwise around the tube, while the outer layer spirals counter-clockwise.

I fitted the drilled rings onto the tube and taped the uprights in place. The uprights were longer than the finished tower and the tape held them in place to the cardboard form, outside of the construction area. I was then able to lace the spiral rods into place. The spirals go half way around (180 degrees) the form. When the whole thing was assembled, I took a narrow brush dipped into Tamiya liquid styrene glue and touched each of the intersections of the rods and the rings. The result, as was the intent of the historical structure, is a very light, yet very strong structure.

There was a bit of a scary moment when I thought the whole thing would collapse when I tried to remove it from the cardboard tube. The glue acts as a solvent and is very effective in gluing the styrene but also effective in gluing the styrene to the cardboard. I ended up using a pair of pliers to twist the cardboard into a tighter spiral to actually remove the cardboard from the inside of the tower structure.

At the front of the vessel there is a small gun tub for a crewman and some form of quick fire gun. Another of the concepts I try to stick by is utility. The doors do not have to open, but there have to be doors. Figures may not actually stand on ladders or stairways but it has to be clear how you get from one spot to the next. There will be a mast and a ladder up the middle of this tower, and a hatch at the top and a door at the hull-bustle to allow a crewman to get from the hull up to the crow’s nest.

So, you ask how does a guy get from the deck out to the gun tub? I envisioned a similar geodesic cage, like a ladder cage along the thicker tube with a cat walk out to the gun tub. As above, I made a smaller thinner card board former and cut rings and laced it carefully with very thin Evergreen rod. Unfortunately, the thin rod, under the stress of the bends, snapped when solvent glue was applied. The resulting mess, the waste of the materials and the time, was very frustrating. I have since sourced some model railroad ladder cages and will try those.

A larger geodesic structure was built for a docking tower and there was no problem with thicker Evergreen rod. The thin stuff is just too fragile. Maybe different glue...
Here is teaser shot of my VSF Zeppelin. Merry Christmas to all!

Tuesday, 18 December 2012

USS Teaser (HMS Indecisive?)

I started this project very early on when I first got onto the internet and became interested in Victorian Science Fiction (VSF).  The (now possibly defunct) Major General Tremorden Rederring's Colonial-era Wargames Page had lots of great inspiration. I was able to Google this site, but it would not bring up the pictures. Or just Google Major General Tremorden Rederring:
I had to do a project on this. At the time, my only Victorian era figures were my 15mm American Civil War. I was more interested in some model building than collecting or painting any more figures--but having said that there are a lot of very nice VSF and steam punk figures in 25/28—so the concept was to continue or re-start and American Civil War in the US south-west desert.
This obvious left the door open to British intervention via air ship-born Camel Corps. And maybe some Martians…


In any case I started with some “Martian” Walkers, which quickly became Confederates from South Carolina. These are scratch built from a bubble-gum machine prize bubble and various diameters of Evergreen Styrene tubing. They went through several incarnations: Originally they were bare metallic, spidery creatures, the “ray” guns of which were yet to be designed. As I refined my concept of the project, I rearmed them with Gatlings made from brass wire and added the funnels and levers and rods to make them more steam punkish. As with any project I cannot guarantee that these are “done”.


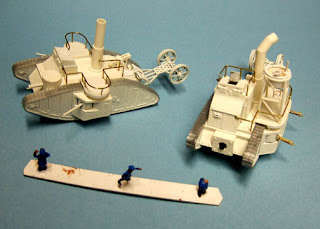
Next up was a couple of steam tanks. These were built as conceived to be Union/American steam units. The basis of the project are Airfix WW1 Tanks. The cabin sections were widened and the bits and bobs added. Brass handrails and a couple of crew men will complete the units. They are shown here in a base coat of white, which will be the overall colour. Just trying to decide now whether to make the upper works the 1890’s battleship buff, and what colour to paint the handrails? Any suggestions are welcomed.
Not shown is the airship project for the British interlopers. It will support some 15mm Essex Sudan era Camel Corps. I built the main zeppelin body out of thin card and an airplane like fuselage is slung beneath. Basic construction is done but it needs paint and final assembly.


Last for today, is an Aether Flyer. A dome on the bottom of the main body filled with some-sort of anti-gravity-floaty-magic supports a flat gun deck. The gun system shown is the second one I put together and like the first one I tried I am not real happy with, so it may not be the final weapon. There is a gun tub at the very front which will have a crewman and a Gatling or some form of quick-fire gun.
While the walkers and the zeppelin have been named I have not yet seriously thought of a name for this flyer. Probably should be called HMS Indecisive, but the idea was to have an American Theme, thus the geodesic mast. (This mast alone will be an eventual tutorial, it is easier than it looks, built up of Evergreen rod.) So it may just end up being USS Teaser. Basic construction is done. Paint and assembly is next. This is usually where my projects stall as I love the building, the designing and evolving a project. Paint however has never been friendly to me. (It knows I hate it?)


The neat thing about this blog is I can show projects and show how prolific a modeller I am. Gee guys look what I built last week! But looking back at my photos of the walkers, they were posted on the Yahoo Groups “Victorian Adventure’ in 2004, meaning they were in progress for some time before that! I posted as “imnotanaga”; the reasons for which you can see in some painted Samurai and terrain on the “ClanWar-L” group. I also showed some 15mm ACW ships on the “jriii” Johnny Reb gaming group.

Sunday, 9 December 2012

15mm Buildings--Part 3

A couple more 15 mm buildings for ACW.  First is a small blacksmith's shop. A basic plastic card box was sheathed in brick paper. The roof is an HO model railroad product laid down in strips. The sign board and door is my standard stained wood.  Named for my buddy Peter. (Stauffer).

Next, a model of the Bryan House from Gettysburg.  Evergreen scribed plastic walls.  Another model railroad product for the roofing.  This is a gummed tape, notched for the shingles.  The chimney is built up of small beads of DAS air-dry clay.

The grey building has a full chimney of DAS beads.

The white building shows another texture of Evergreen scribed siding. I think this one is the clap-board. Note the N sclae model railroad windows.

Finally another red barn with dyed wood cladding.  The roof is layers of masking tape to simulate some form of tar paper roof.

Wednesday, 5 December 2012

15mm ACW Terrain--Part 2

Here are a couple more images of 15mm buildings.  The barns are done board by board with 1/32 thick balsa sheet strips. The strips are soaked in a thin black wash then trimmed and glued onto a carboard box building.  While time consuming, the result is nice. 

The cabin is a more traditional model, built up from round wooden toothpicks.
The roof is card tiles, again placed one by one.
Paint is base colours, dark wash and light drybrush.  

The idea is too have all of your materials precoloured The farm house is a simple white on the
slats, but the tile roof and the barn cladding is all pre-stained balsa.


Next, a wheat field. This was made by pre-painting some balsa strips an earth colour,
gluning down some Woodlands Scenics grass and clamping down another balsa stip.
When dry, the stips were trimmed and arranged into field rows.

You can see the strips more clearly in the lower left.
Finally an homage to anyone who travelled I-75 through Tennesse and Georgia as I did many times in the 1970s and 80s, we always passed by Nashville and  Lookout Mountain and Chickamauga and never stopped! Saw about a billion of these signs however:
The same board by board cladding, but this time the wood was stained red first.


Sunday, 25 November 2012

15mm Gettysburg Terrain

I was sitting in a campground in Round Top, mere paces south of Big Round Top in Gettysburg, looking at gravel. My Dad and I had spent the day touring the battlefield, looking at monuments and trying to get a feel for the terrain. We saw the huge boulders of Devils Den and paced along side the stone and rail fences that line Cemetery Ridge. The dark gravel at the campground was interspersed with larger lighter coloured rocks. Hmmm…

Stone and rail fences on Cemetary Ridge
One method of recreating rail fences in miniature is to use the real material—wooden rails! The campground gravel would make perfect stone fences in 15 mm! Shown are rail fences made for Jonhny Reb gaming. They were created from wooden toothpicks and the gravel I picked up in Pennsylvania.* The models show a technique I have been using more and more in my models: rather than build a model and then have to paint it, it seems to me to be more effective to build the model with natural or pre-coloured materials that do not require painting.


Fences near the Bryan barn,
After spending a few evenings with a sharp craft knife and a box of band aids, I was able to trim to square a small heap of toothpicks. The “rails” should be fairly even along their length and the rounded tips of the toothpicks should be trimmed off. I then prepared a light wash of black acrylic craft paint diluted with water in a recycled plastic yogurt container. The cup was big enough to hold a couple ounces of wash and my pile of toothpick rails. The rails were placed into the wash and allowed to soak for several minutes. They were then spread out on some plastic wrap and left to dry.


15 mm fence sections using Gettysburg gravel and toothpicks!
While the rails dried I cut some thick card (I use 1/16 thick “show card” which is the cheap form of matte board) to approximately 2 inch by ½ inch size bases. These were then painted grass green and terrained with model railroad grass. Usually the acrylic paint is sufficient to stick the grass to the card, but you can mix the paint with a bit of white glue for extra adhesion. These particular pieces were made several years ago when I was still using the sawdust style of railroad grass. Woodland Scenics makes various colours and textures of “Turf” which I am now using on current models. I liked the irregular nature of the sawdust, but it has become harder to find these days.


The Iron Brigade advances to the fence line. 15mm figures painted by my friend Kirk Doherty.
When everything was dried, I began to glue a layer of gravel along the center line of the card bases. I used super-tacky white glue, which dries clear. I sorted the size of the gravel to keep the fence sections uniform, but on some bases I glued on a second layer of stones. Its best to let your glue dry first before proceeding. I get antsy and like to work quickly, but it is frustrating when things don’t stay put or fall off the bases later because they were disturbed before the glue had a chance to dry. On top of the stones I glued a line of rails. This was followed by the “X” form of the support rails, allowed to dry again and finally a top rail was added to the crux of the “X” supports. And, the best part, no further painting is required.


Devil's Den looking towards Little Roundtop.
The larger rocks I had picked up were used to build a Devil’s Den type formation. A heavier plywood base was cut to size and the large rocks were washed and hot-glued into place. Some white styrofoam sheet was used to slope the hill behind the rocks. I used fairly thick pieces of foam, but slope could be built up in several layers. Try a stand of your figures on the slope to see if they slide off. Remember a fairly shallow slope is desired, but the rocks are about 3 inches high and I didn’t want this terrain piece to get too big a footprint. The foam was finished off with some drywall mud which was spread thickly on the foam, allowed to dry and then sanded smooth. This was followed by craft paint green and the remainder of my railroad grass. I added a toothpick and pebble rail fence to finish it off. The rocks were left their natural finish.


Devil's Den in 15 mil using "Gettysburg" rocks!

* It would be illegal, immoral and fattening to pick up “samples” from the actual battlefield. I suspect my gravel was trucked in from New Jersey, but to me it is “authentic” Gettysburg!

Sunday, 18 November 2012

Confederate Gun Positions

Here are a couple of gun positions for 28mm ACW gaming:
This one is a TA miniatures http://www.taminiatures.com/  8 inch columbiad. The gabions are originals that my friend cast for me. This piece weighs a ton!


Next one is also a TA gun but a more conventional base of foam, strip wood and some terrain material:


TA has limited poses for the crew so I converted a couple of TA figures with head swaps and converted a couple of Dixon figures with head swaps and green stuff to come up with some variations of crew:


Next is a RAFM gun:


Friday, 16 November 2012

Welcome to Rob's Blog!


This is Rob's blog on model building, figure painting, gaming, trains, Civil War history and travel and whatever else I happen to take a crack at blogging about. Just as a teaser, here is an image of a scratchbuilt VBCW tank.  It is an American M2 Medium built with Evergreen plastic and some Alumilite castings.  More to follow...stay tuned. Rob.

28mm (1/56) American M2 Medium