Monday, 25 February 2013

Update and the HBG!

Here's an update on the Winnie.  Basic colours are done. Needs highlighting and details, then the base and some further detailing. (Chairs, maps, etc.)
When building, I usually try to use strip or sheet stock that closely matches the size of what I am attempting to recreate. Since I work small, I generally do not have thick stock on hand. Luckily the Evergreen sheet laminates well.  Make sure the surfaces you are gluing are flat and free of debris. Sand or file the surface to get a smooth flat area to glue. What you don't want is areas de-laminating or showing cracks when they are cut to final shape. Using Testors solvent liberally coat both sutfaces and press tight together.  The solvent dissolves the surface of the plastic and if you do this just right, the seams are near impossible to tell.
Here, a few parts blocked out in multiple sheets of suitably thick plastic. They will be an axle support, the main trail and cheek pieces for a large Parrot gun.
And speaking of large guns, here is the start of an HBG (Honking Big Gun!).  This blank was carved and spun fron a length of dowell. Sometimes the handle of a paint brush will give a perfect shape for a big gun.
This is a Rodman, maybe 10 plus inches. These guns had a distinctive slotted breach, used for elevation.  Here is a styrene "blank" which will be sanded and filed to finished shape.  The slots are set in with 40 by 60 thou strip.  We'll see how the nicely formed slots withstand the final shaping!

Sunday, 17 February 2013

A Sling Cart

Google "sling cart" and you will come up with something like this:
These were used to move large fortress guns.  Note a fairly standard artillery limber to lead (left).  The central portion is a large wheel with (at my count) 24 spokes.  Note how the wheel is "dished' to both sides, and how the spoke spacing does not seem equal.  It looks to me like the inner set of spokes is 16 evenly spaced spokes. The outer assembly, looks to be only 8, for a total of 24 spokes.  The trailing unit is a single sided 16 spoke wheel. So, if I can figure out how to cast this thing, I could cast up 4 identical wheels, and two outer bits to make the central unit. Based on drawings I have seen, the central unit appears to be some kind of 'bottle-jack' while the trailing unit is a central screw and a handle to crank up or down. There is also an etching that shows a gun sling being towed by a hundred or so men. These guns were heavy and you didn't always have horses or mules available...
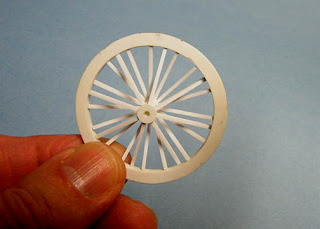
This shows a plastic ring taped down onto my building jig. The central hub has a spacer, a ring to set the spokes on and an outer spacer to form the hub. The jig is marked for 8 equally spaced spokes. Individual spokes, in this case .040 by .060 Evergreen strtip, are cut and fitted. A small bit of .040 sheet raises the outer end of the spoke to center on the outer rim. The spokes angle upwards slightly as they merge at the hub.

This shows 16 spokes for the inner and standard wheel.  The spokes were glued in place at the rim and the hub with Testor's liquid solvent.  Note the drill bit used as an axle for temporary allignment. It has a couple of turns of masking tape on it. This allows a bit of downward pressure to be put onto the hub.  If the spokes are a little tight, the hub tends to lift off the building board. The tape on the drill allows you to press it back into position.

However, before I started the 16 spoke wheel, I made a "spider' of a section of the hub and only 8 spokes. The 8 spokes were glued only at the hub and carefully removed as an assembly when the glue dried.

This shows a trial assembly of the 24 spoke wheeel.  Note the outer disk on the hub. This strengthens the spokes, and a bit of green stuff will fill in the gaps at the hub around each spoke.
See how the wheel is "dished" on the inner and outer surface. I originally thought the spokes were a little thin, but I think the wheel matches the spirit of the picture if not the precise dimensions.
So here is a 'master' for the wheels with the Redoubt VMI cadet for scale. This figure is a large 28, so the wheel will look even bigger next to my 'standard' Old Glory 28s.

Monday, 11 February 2013

The Winnebago Pt2

Took a little break this week as my son and his wife had a new baby!
Everleigh Iris, scratchbuilt, full scale...7lbs, 5ozs.

So I finished off the construction of General's wagon. Primer is drying as I type and it is ready for paint. Shown here on the workbench with an Old Glory 28mm  Union officer and chair.

 
Lots of teeny bits for the mail slots.  They are not perfect, but some dressing up with maps and such will give the impression of a busy office space. I hope to add a few details, maybe a lantern or a coat rack in the bed area.


Saturday, 2 February 2013

A Civil War Winnebago?

The next project on the list is a general's office wagon.  Apparently Union General George Thomas had an office wagon, but internet resources for this are rather slim. I did find one inspirational image: 

http://travelphotobase.com/v/USVA/VASA219.HTM

So as I planned how to build one in minature, I first decided I would need to build an awning over the desk area (in case it rains).  Then had to decide what was going on inside the wagon?


Obviously, if I were a general, I'd have a place to ride and do some work, so a small desk and chair at the front of the wagon in a wood paneled office.  And why not a proper bed in the back of the wagon?


Of course I would have a portrait of my dear wife and maybe some nice wall paper on the wall?


So some quick Google searches for images and a quick visit to Photoshop.


Lots of work to do yet. Needs bedding and curtains (like the ambulance) A couple of chairs--I have some of the Old Glory seated officers on chairs. An awning over the external desk.  And how to build all those little mail slots on the outer office?